Segala Hal Tentang Elektronika Mulai dari Teori Komponen, Alat/Bahan, Rangkaian, PCB, Penyolderan, Perakitan, Instalasi, Troubleshooting, Perbaikan Rangkaian, Craft Unik dan Hobi Elektronika
Ajang pameran mobil
Geneva Motor Show yang diadakan setiap tahun dipastikan selalu dipadati oleh
mobil-mobil teranyar nan spesial dari seluruh pabrikan mobil di dunia. Tak terkecuali
pabrikan mobil-mobil super keren nan eksotik dan ekslusif seperti Ferrari,
Bugatti atau Lamborghini.
Dan sebagaimana tahun-tahun
sebelumnya, pada ajang 2014 kali ini pun mobil-mobil teranyar hasil karya mereka,
yang umumnya hanya diproduksi secara terbatas, menjadi primadona diantara yang
lainnya.
Dan berikut 4 mobil super
sport yang bisa dikatakan sebagai bintang utama pada ajang tahunan tersebut.
1. Ferrari California T
Mobil teranyar
pabrikan asal Italia ini selain memiliki desain yang menawan juga diperkuat oleh
mesin yang bertenaga. Dibawah kapnya terdapat jantung V8, 3.8 liter turbocharged yang mampu menghembuskan
tenaga hingga 552 hp dan mampu membawa mobil dengan atap yang dapat dilipat ini
melesat menuju 100 Km/jam hanya dalam waktu 3,6 detik.
2. Lamborghini Huracan
Penerus Lamborghini
Gallardo ini sudah membius banyak orang bahkan sebelum diperkenalkan secara
resmi. Dibalik kapnya Lamborghini
Huracan dibekali jantung V10, 5.2 liter yang mampu menghembuskan tenaga
sebesar 610hp. Melalui performanya tersebut, Huracan mampu melesat hingga
kecepatan maksimum 325 Km/jam
Powered by 5.2-liter
V10 that’s good for 610 horsepower and 413 lb-ft of torque, the Huracan has a
top speed of 202 mph and a 0-62 mph time of just 3.2 seconds.
3. McLaren 650S
Seolah tak ingin
kalah populer dengan para pesaingnya dari Italia, mobil super asal negeri Ratu
Elizabeth ini pun tampil dengan desain yang cukup menggoda. McLaren 650C yang dibekali mesin V8,
3.8 liter lengkap dengan turbo kembar (twin-turbocharged) berkekuatan 641 hp
ini mampu melesat hingga kecepatan 100 Km/jam hanya dalam waktu 3 detik.
4. Koenigsegg One:1
Dan yang paling super
diantara mobil-mobil super yang ada adalah mobil sport asal Swedia, Koenigsegg One:1. Melalui mesin V8, 5.0
liter yang mampu menyemburkan tenaga hingga 1,340 hp, One:1 bahkan diklaim dapat melesat hingga kecepatan maksimum 434.52
Km/jam.
Dan melalui segala
kemampuannya tersebut, mobil baru dengan
berat 1.341kg ini pun digadang-gadang menjadi mobil dengan predikat “Megacar”
pertama di dunia.
Pada awal kehadirannya, mobil-mobil murah LCGC sempat diprediksi
bakal menggoyang pasar mobil bekas di tanah air karena faktor harga yang tak
jauh beda. Namun, seiring perjalanannya pasar mobil bekas justru tidak terlalu
terpengaruh karena dianggap sudah memiliki market tersendiri. Terbukti hingga saat
ini meskipun mobil murah LCGC laris manis bak kacang goreng, mobil-mobil bekas masih
tetap diburu.
Para pebisnis mobil bekas pun tidak ada yang mengeluh
mengalami penurunan omzet, bahkan Manajer Pemasaran Senior pasar mobil bekas
WTC Mangga Dua,Herjanto Kosasih, beranggapan bahwa kehadiran LCGC justru
menambah pilihan untuk calon pembeli.
Menurut
Ketua I Gabungan Industri Kendaraan Bermotor
(Gaikindo), Jongkie D. Sugiharto, sebagaimana dikutip dari laman
kompas.com (05/02/2014), mengatakan bahwa kehadiran mobil-mobil LCGC
justru akan berpengaruh
pada pasar mobil kelas multi purpose
vehicle (MPV). Menurutnya, pasar mobil MPV pada tahun 2014 ini masih tetap
menjadi yang terbesar hanya saja akan terjadi pergeseran pasar MPV akibat terbentuknya
pasar baru pada kelas LCGC.
Berkaca pada tahun 2013, dimana hanya dalam waktu
kurang dari 4 bulan terjual sebanyak 51 ribu unit, tahun 2014 ini mobil murah
LCGC diprediksi akan mampu terjual hingga 120 ribu unit. Terlebih, dengan ikut sertanya
pabrikan Datsun yang akan
menghadirkan mobil GO+ 7-penumpang
sebagai salah satu jagoannya, alternatif pilihan yang tersedia di segmen LCGC
ini pastinya akan lebih menggoda lagi bagi para konsumen.
We think Mike Gold's
brother said it best when he came through the doors of Revolution
Vehicle Dynamics, looked at our S-10 Blazer, and said, "That looks like a
Micro Machines monster truck!" With 35-inch Baja Claws sitting under
it, our little Chevy certainly was looking tough.
We decided to
make some drastic changes to our '96 S-10 Blazer last month. The IFS
suspension parts had worn out, the brakes were shot, the steering was
all over the place, and the Almighty Dime had basically been parked
until we could do something.
That “something” ended up being a
solid-axle swap for our mini Blazer. While it would have been nice to
keep the 4WD independent front suspension and done some type of
long-travel kit, we're not aware of any kits currently available, and
the cost of fabricating one would be more than our S-10 is worth (which
is no excuse: We often buy parts worth more than our trucks). A few
people suggested getting rid of the 4WD and putting a 2WD long-travel
kit on, but losing such an advantageous thing like four-wheel drive
seems unreasonable to us. Our Almighty Dime sees more than just desert,
and while it may not be able to go quite as fast off road (with a solid
axle), a four-wheel-drive solid-axle setup will allow us to do
everything we want to do while not being too expensive to boot.
We
did some research, gathered some Wagoneer Dana 44 axles, Wagoneer front
springs, a Sky's Offroad Design SAS (solid-axle swap) hanger kit, and a
few other incidentals we needed to make this all work smoothly. Mike
Gold at Revolution Vehicle Dynamics in Apple Valley, California,
assembled the pieces, built a steering draglink to connect to the
Wagoneer axle's tie rod, and bolted some Rancho Pro Series shocks and
Mickey Thompson 35-inch Baja Claws onto the Almighty Dime. Our mini
Blazer was ready for an initial shakedown run that ended shortly after
realizing how much it wandered.
While the project was moving under its own power, there was (is) definitely still work to do.
Our two real problems were front suspension wandering and front-wheel drive.
After
the first run, there was no question that the SUV needed a front track
bar. Mike fabbed one up and we went back out for another round of
testing, only to tweak the stock front Wagoneer leaf springs. This left
our S-10 sitting low in front and slightly angled to one side. After we
add some new Rancho 44044 Wagoneer front springs, the front should be
back up to the correct height.
As for the front-wheel drive
issue: We ran into a problem we weren't expecting with the long
slip-yoke (not fixed) output shaft on the front of the S-10's NP233C
transfer case. None of our local driveshaft shops could make us a front
driveshaft that would work for our solid-axle swap. The first option we
thought of was to swap the T-case. There are adapters available to put a
few different transfer cases in back of our S-10's 4L60-E transmission,
but our recently rebuilt NP233C is electronically shifted via a dash
knob and already in the truck. Keeping the stock transfer case is
definitely going to be the easiest route, if possible. A little more
S-10 T-case research revealed that there are many similarities between
the NP233C found in S-10s and the NP231J transfer case found in
Cherokees. Other S-10 owners have had success swapping a front output
from a Cherokee T-case into the NP233C, so we're in the process of
tracking down a donor NP231J now.
It is close to done, but the
Almighty Dime project is not quite finished. It's reached a point where
it is stable at 65 mph and can handle prerunning duties with almost no
tire rub. But some better bumpstops, lower gears, and most importantly
four-wheel drive would complete our Almighty Dime.
1.
Our S-10’s solid-axle swap revolves around 1980-and-later Jeep Wagoneer
Dana 44 axles. Using them would give us an axle strength upgrade, a
brake upgrade, and a suspension that was better suited for off-road use.
2.
We used a Sky’s Offroad spring hanger kit to get the front Wagoneer
axle on. Mike Gold of Revolution Vehicle Dynamics built a rod end
draglink to connect to the stock tie rod of the front Dana 44 Wagoneer
axle. He reused the original pitman arm on the steering box by modifying
it to accept a rod end.
3.
Since the Wagoneers had all-wheel-drive setups, there were no locking
hubs on the front axle we swapped. We added a set of stainless-steel
Mile Marker lockout hubs to the Dana 44 to give us 2WD/4WD capability.
3.
Since the Wagoneers had all-wheel-drive setups, there were no locking
hubs on the front axle we swapped. We added a set of stainless-steel
Mile Marker lockout hubs to the Dana 44 to give us 2WD/4WD capability.
4.
To get the rear axle driven by the transfer case, all we had to
purchase was a conversion U-joint to get from the original S-10
driveshaft to the swapped-in Dana 44 rear axle. We’ll have to change the
driveshaft completely if we decide to do a fixed-yoke kit in the rear
of our NP233C transfer case (recommended).
5.
The front output shaft of our S-10’s NP233C transfer case was causing
an issue. The solution is to swap in a front output shaft and yoke from a
NP231J Cherokee T-case into our NP233C. As soon as we find a donor
NP231J ’case, we’ll get four-wheel drive back.
6.
Luckily, the Wagoneer axle’s shock mounts lined up in the rear (with
the frame mounts) and we easily lined up the fronts since we used Sky’s
weld-on Toyota shock hoops. But at ride height, our front 12-inch-stroke
Rancho shocks had only a few inches of compression travel. While it was
at Revolution Vehicle Dynamics, Mike figured out a solution. He
realized he could cut off the front axle’s original shock tabs off the
housing and reverse the U-bolt plates from left to right. The Wagoneer
U-bolt plates have single-shear studs coming off of them for sway bar
link mounts in front of the axle. By turning the U-bolt plates around,
Mike effectively made a new lower shock mount that gave us about 2.5
inches more compression travel. While a single shear mount is not ideal,
we believe it will be strong enough for this application.
7.
After taking its initial shakedown run, the Wagoneer front axle proved
to wander too much and was pushed side to side by the steering system.
Wagoneers used track bars straight from the factory for this very
reason, so our front axle already had a track bar bracket. Mike fabbed
up a track bar bracket on the frame and a rod end track bar to match,
keeping it parallel with the steering draglink.
8.
The rear had no issues. We used Sky’s S-10 shackles, the stock S-10
leaf springs, and welded new spring pads to the axle. The upper and
lower shock tabs even lined up. With the lift shackles, the stock leaf
springs, and the spring-under axle, we were able to put on 315/75R16
(35-inch) Mickey Thompson Baja Claws on Classic III aluminum wheels.
9.
Wagoneers came with 15-inch wheels, which typically have a higher
offset than a 16-inch wheel does. When we went to put on our new 16-inch
Classic III wheels, we didn’t get more than a few feet out of the work
bay before having to stop for a rubbing noise. The tie rod ends were
actually rubbing the 16-inch wheels. We would have gone with a 15-inch
wheel, but tires for 15-inch wheels are getting harder to find and 16s
opened up tire selection for us.
10a.
Four G2 Axle & Gear billet wheel spacers solved the issue for us.
Not only did it allow clearance of the tie rod ends and wheels, but it
also allowed us to clear the front leaf springs at full steering lock.
The added 1.25 inches of width to each side brought our track width back
to about that of a factory Wagoneer.
10b.
Four G2 Axle & Gear billet wheel spacers solved the issue for us.
Not only did it allow clearance of the tie rod ends and wheels, but it
also allowed us to clear the front leaf springs at full steering lock.
The added 1.25 inches of width to each side brought our track width back
to about that of a factory Wagoneer.
11.
While we had no front-wheel drive yet, we did make it around as best we
could in rear-wheel only. We were definitely impressed with how far the
Mickey Thompson Baja Claw radials took us in 2WD.
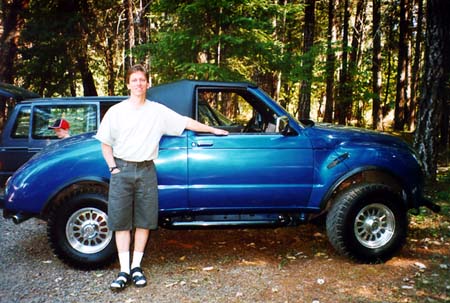
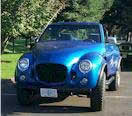
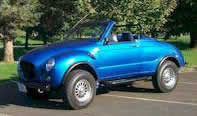
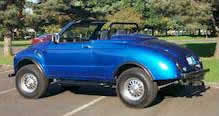
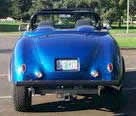
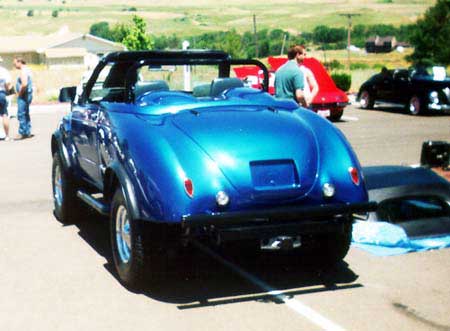
"The
Rodster® is a kit car based on the Chevy S10 donor platform.
The car you see here is the first Rodster® built on a lifted
4X4 S10 Blazer."
"The
Rodster® is a superbly designed and engineered kit
that is probably the most practical and economical specialty car
around.
I put
the kit together in just 2 months, working evenings and weekends.
Everything went together and fit perfectly. The quality of the
fiberglass was excellent. The S-10 Blazer is a perfect donor vehicle:
I used an '89 with a fuel-injected 4.3L V6, A/C, power everything,
tilt wheel and cruise control. I added a 3' lift kit, 31X10.5R15LT
tires, fender flares, exterior hood latches, tube bumpers and
nerf bars, and a tow hitch, which makes it the ultimate cruising
SUV.
With the
hard top, I can drive it every day and I do. Why wouldn't I?
Doing
business with Rodster®, Inc. was a pleasure. They worked
with me on special requests and I got all my parts on time. I
was also able to call when I had specific questions about the
buildup.
My 4X4
Rodster® is great! Pardon my enthusiasm, but it's hard
to not be excited when all I have to do is drive it or park it
or whatever and I get tons of positive comments and questions."
Kraig
Short
Hillsboro,
Oregon
Note: This article originally
appeared in Tach'n Opinion, the monthly newsletter for the Oregon
Handcrafted Automobile Association (OHAA).
I noticed that last month's
newsletter was a little thin. Al can't do everything by himself, so
I thought I might write a little about my recent car project. I've built
two cars in two years now so I guess that qualifies me as a kit car
enthusiast. Actually, I think the bug bit me pretty hard. Those of you
who have built your own cars understand the gratification that comes
from our hobby. It's been said that some people are builders and some
are drivers. I think I'm a builder. No sooner do I complete one project
than I feel I need to start another one. At any rate, here are some
of the details of my Rodster® project.
I've always loved 4x4's and
have owned several Jeeps, a Toyota pickup, and a Nissan Patrol. After
I built my '29 Mercedes replica, I began to wonder why not more kits
were offered on a 4x4 donor platform. I even considered how cool it
would be if someone designed an off-road kit resembling the Hummer.
Well, I guess I wasn't the only one with that idea. Anyway, I was just
about ready to plunk down some cash for a Jeep Wrangler when I saw the
Rodster® featured in one of the magazines. I noticed it was
designed for the S10 Blazer, specifically for the 2WD version. I thought,
'The Blazer is a four-wheel drive vehicle, isn't it? I wonder what
that kit would look like on a 4x4 with a lift kit and big tires?' Well,
the idea was born and it took hold in me with a vengeance.
There are five basic, if
oversimplified, steps to building a Rodster ®:
Obtain donor.
Cut it up.
Obtain Kit
Attach Kit Parts to donor.
Paint.
However, if you figure in
a few mistakes along the way, and a few modifications to make the kit
work on a 4x4, I think the actual number of steps is somewhere around
4,383. Step 1: Obtain Donor.
I thought about the Rodster®
kit for months before I did anything about it. I told myself (actually,
my wife told me) that I didn't have the money or the time to start another
project. Not to mention that half of my garage was already occupied
by a newly finished car and my wife used the other half for parking
the minivan. Undaunted, I scoured the papers for a suitable Blazer donor
vehicle. After all, even if I didn't build a Rodster,® I
could still use a Blazer, right?
The Oregonian advertised
that a particular 1989 S10 Blazer 4x4 could be had for 3000 something
with a slipping transmission. I decided to check it out. The transmission
didn't seem bad at all. Maybe it just needed fluid. I offered $2700.
SOLD! The next day the puddles on the garage floor revealed that it
needed fluid all right. But no matter how much I put in, it still ended
up on the garage floor, and the transmission slipped regardless.
My Blazer had some redeeming
qualities. It was a 4.3L V6, which I would need to help turn the bigger
tires. It was also the Tahoe package, which included A/C, cruise, tilt,
power windows and locks, all of which were retained in the finished
vehicle. I didn't get to use the two-tone paint, roof rack, and rear
window wiper/washer/defroster. Bummer. One nice feature was little dome
lights built into the rear view mirror. That comes in handy in an open
top vehicle. It also had a cheap-o alarm system that didn't work, which
took me a couple of hours to cut out of there. The Pioneer detachable
face CD player is pretty nice, I imagine, but I don't know because it
came with the face detached. Some previous owner probably thought they'd
get back at the dealer for not giving them a good trade-in value. The
face costs 80 bucks to replace and it's a crapshoot because you still
don't know if the CD player works.
Anyway, the truck spent the
winter in the rain slowly losing air from all four of its bald, mismatched
tires.
Step 2: Cut it up.
This was the fun part. But
before you lay a blade to your nice Blazer donor vehicle, you better
make sure that you're getting a Rodster® kit. You may even
want to switch steps two and three. I didn't, but hey it might be a
good idea anyway. For clarification, your steps would be:
Obtain donor.
Obtain Kit.
Cut it up (er, the donor
that is).
Attach Kit Parts to donor.
Paint.
My step 2 was cutting up
the donor vehicle. I ordered an assembly manual from Henry Caroselli,
who designs and sells the kits. But I wanted to get to know the company
more up close and personal, you see, so I planned a visit to his shop
in El Segundo, California.
Hmmm, how to justify a trip
to Southern California? Hey, isn't Disneyland down there? Aren't we
about due for a family vacation? Hey, kids let's go to Disneyland! Yea!!!!!
We drove all the way down in December right before Christmas. We saw
Disneyland, Knott's Berry Farm, Six Flags, the beach, and of course,
the Rodster® factory (which just happens to be pretty close
to the beach).
I was impressed with the
company, to say the least. It looked like he was cranking out kits at
a pretty good clip. Although the fiberglass work is done elsewhere,
I was able to see some completed cars, including the Power Tour car.
I asked lots of questions. Specifically, I took measurements of the
wheel wells on the Rodster®, because I needed to know exactly
how much tire I could scrunch under there with a reasonable amount of
lift.
I went home and stewed for
a couple more months before making the commitment (read coughing
up the cash for a down payment). If you have to justify everything
you do you're not going to be very happy. I bought it because I wanted
it. The whole project was financed by VISA and Home Equity Loan. (My
other kit car and my Mazda MX-6 are still for sale, by the way.)
It's time to start cutting.
Follow the instructions very carefully. Don't get too carried away.
That said, this was a blast. I got the manly tools for the job: sawsall,
grinder, hacksaw, pry bar, etc. Lifting the roof off with two hands
and tossing it off into the yard was quite a thrill. The pile of parts
I removed was as big as a car, and the Blazer really didn't look like
one anymore. I sold off a bunch of the extra parts, and I still have
a few. If you have questions about the exact location of a cut, wait
until you get the kit before you finish it off.
I did a few more things before
picking up the kit. I installed Rancho shocks, new spark plugs, wires,
fuel filter, K&N filter, and other miscellaneous parts. I installed
the 3" body lift, which wasn't nearly as hard as I thought it would
be. The tricky part was rigging up the right jack the right way. Also,
since my Blazer has the collapsible steering column, I didn't have to
make any other major modifications. The shift linkage had to be modified,
and the driveshaft tunnel and shift boot needed mods for the floor-mounted
4x4 shifter. I also took the opportunity to drop the tranny and have
it rebuilt. The remainder of the 4x4 and performance goodies were on
their way from JC Whitney.
Well, I think
that's enough for the first installment. Next time you'll see how I
got another trip to California and why I had to sleep in the minivan
in the front seat that wouldn't recline. Also, we'll start building
the Rodster®. Seeya.
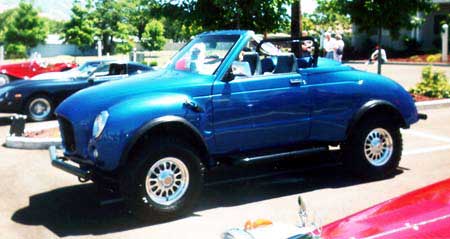
Features Original Car
1989 Chevrolet S10 Blazer
4X4 Tahoe edition. 4.3L V6 with Automatic transmission, A/C,
Power Windows, Power Locks, cruise control, tilt wheel, digital gauges.
Car has 165K miles but the engine has been rebuilt.
Mechanical and Performance
3" body lift, 31x10.5R15LT
tires on 15" American Racing fully polished alloy wheels, Rancho
RS5000 shocks, SUPER chip, K&N filter, new exhaust including 2
1/2" catalytic converter and Flowmaster muffler with 3"
chrome tip, 3500lb receiver hitch, newly rebuilt transmission with
shift kit and clutch pack, new battery.
Kit Details
Custom 4-row radiator,
high capacity electric fan, new A/C condenser, custom front and rear
3" tube bumpers, 3" nerf bars, tilt front hood section
with exterior hood latches, front and rear fender flares, removable
fiberglass hard top with rear window, vinyl bikini top, custom carpet-covered
cockpit-to-trunk wall and speaker enclosure, detachable face CD player
with 4 speakers, amp and subwoofer, custom center seat with seatbelt
folds down for use as an armrest, Grant signature series steering
wheel.
Very fun for cruising, gets
19 mpg. Built to be driven. Drove it to California over
1200 miles without any problems. Driven in city traffic in very
hot weather without any problems. Nice stereo, fully enclosed
securable trunk area. Performance chip and muffler give it a great
sound and tire squealing ability. Gets a lot of looks and comments.
Updated Build the website you need with these free web design programs
Simple WYSIWYG (What You See Is What You Get) web design programs make creating basic sites as easy as using a word processor.
The
next step up combines a WYSIWYG approach with more detailed low-level
control of what you're doing, very useful when you're looking to create a
more impressive site (although you may have to spend some time learning
the basics).
There are plenty of high level applications
aimed at the more experienced users, who like to be able to focus on
the HTML, CSS or scripting code.
And of course you may also need tools to create your graphics, analyze the finished site and diagnose any problems.
Whatever
you're looking for, though, we've found a free tool which can help -
just keep reading to discover our pick of the best free software for web
design.
1. CoffeeCup Free HTML Editor
CoffeeCup Free HTML Editor is the free version of a commercial product, and so missing a few tools (CSS menu design, FTP upload and so on)If you're a beginner, though, this probably won't matter too
much. You can use the Open From Web option to open an existing web
page, for instance, and tweak this to add your own content. There
are plenty of powerful editing tools, a local Help file to walk you
through the more complicated parts, and you can also upload your page to
CoffeeCup's S-Drive platform, where it will host it for free.
------------------------------------------------------------------------------------------------
2. Notepad++
Notepad++
is an amazingly powerful source code editor with a vast number of
features. Syntax highlighting makes it immediately easier to read and
understand your code, for instance.
Code folding allows
you to collapse some areas while you focus on others. Auto-completion
helps you enter code more quickly (and accurately). There's
also a powerful search tool, easy document navigation, bookmarking,
macro support, and more, all of which is presented in a highly
configurable, easy-to-use interface. Go grab a copy immediately.
------------------------------------------------------------------------------------------------
3. PageBreeze
Experienced web designers won't be impressed by the PageBreeze
- it's based on old technology, and distinctly short of features - but
if you're just looking to create something very simple then it's a
different story. This WYSIWYG editor comes with simple templates to help you get started (they're fairly ugly, but you can add your own later).
You
can add links, images, tables and forms in a click or two. It's easy to
see and edit all your site pages, and when you're done a built-in FTP
client puts your work online. So while the end results may be basic, the
program's simplicity makes it worth a look for the novice.
------------------------------------------------------------------------------------------------
4. Firebug
You've designed your website, but it doesn't quite look or work as you'd expect - and that's where Firebug
comes in. This powerful Firefox extension helps you to view HTML and
CSS code; adjust your styles and see the results immediately; understand
your page layouts; debug and log JavaScript; manage cookies, analyze
page load times, examine error messages and more. Clearly
there's a lot of power here, but Firebug isn't just for web experts. At
first you might only use it for a few basic things, just viewing code
perhaps. It'll still be very useful, though, and you can begin to
explore other functions at your own pace.
------------------------------------------------------------------------------------------------
5. Bluefish Editor
Bluefish is a programmer's editor which also includes plenty of web-related tools and options.
This starts with the usual editing tricks: syntax highlighting (ASP.NET,
CSS, HTML, JavaScript, PHP and more are supported), code folding,
powerful find and search and replace tools, autocompletion, and more. The
program also supports document templates; has wizards to add CSS,
forms, tables, forms, audio and video objects; quick tag editing and
easy previewing of the current document, amongst many other goodies.
------------------------------------------------------------------------------------------------
6. Brackets
Brackets is an interesting open-source HTML, CSS and JavaScript-based code editor, created and maintained by Adobe.
The
program deliberately avoids cluttering your workspace with floating
toolbars and large icons, instead allowing you to work directly on your
code, with plenty of shortcuts to help. Click
in an HTML tag, say, press Ctrl+E and you'll see a Quick Edit box with
any related CSS rules, just select the one you need and you'll be able
to edit it right away.
It's just as easy to edit
JavaScript code. And a Live Preview feature means that there's no need
to refresh your browser each time to see the changes - they're updated
right away.
Add the growing list of extensions and,
while it's still early days, Brackets is looking like an interesting
tool for experienced web developers.
------------------------------------------------------------------------------------------------
7. KompoZer
It's not been updated for some time, but KompoZer
can still be a useful web editor for beginners. The program works like a
simple word processor, so you don't have to know about HTML, CSS,
scripting or anything else: just enter your text, format it, and click
the various buttons to add links, insert tables, images and more. If
you're a little more experienced than KompoZer does have further tools
which may help, including an HTML editor. The program is beginning to
show its age, though, so more experienced web designers would probably
be better off elsewhere.
------------------------------------------------------------------------------------------------
8. OpenBEXI
OpenBEXI
is an interesting WYSIWYG HTML editor which allows you to create pages
just by dragging and dropping "widgets" - everything from text, links
and images, to forms, graphs and flowcharts - and tweaking them to suit
your needs.
It's also possible to tweak CSS or add scripts to the page, and a built-in FTP client will upload everything when it's done. While
this sounds great, there are problems. It's easy to add objects to a
page, for instance, but getting them to work as you'd like can take a
little while.
The browser-based interface has some
issues, and the need to use a server might confuse beginners, too. It's
still a quality tool, but you'll need some PC (though not web design)
experience to make the most of it.
------------------------------------------------------------------------------------------------
9. GIMP
Every web designer needs great graphics tools, and GIMP
is one of the best free image editors around. It has impressive photo
retouching features, lots of useful special effects, a range of powerful
paint tools and more. Strong
colour management ensures your images always look at their best. Layer
support helps you control which parts of your images are tweaked, and
which remain untouched. And it's then easy to save your images for the
web.
The interface isn't always the best, and with so
many options GIMP can seem intimidating at first. Once you've learned
the basics, though, you'll find there's very little the program can't
do.
------------------------------------------------------------------------------------------------
10. BlueGriffon
BlueGriffon takes a straightforward WYSIWYG approach to web editing, but also manages to include plenty of more powerful features.
You
could just use it to type text, insert images, tables, audio files,
videos and so on. But there's also an SVG editor, form design tools,
some CSS support, an accessibility checker, DOM Explorer, and more. One
annoying aspect of the program is that several options (even that
manual) require commercial add-ons, which means clicking the wrong
button will take you to the BlueGriffon site to find out more.
You soon learn which options are available, though, and on balance BlueGriffon is a capable and generally easy-to-use tool.
By Mike Williams
http://www.techradar.com/news/software/applications/best-free-web-design-software-10-programs-to-get-the-job-done-1138669